Have you ever spent uncounted hours creating an incredible piece of digital art on Procreate to realize the quality is too low for printing or selling? Exporting high-resolution images in Procreate requires a little planning ahead in the beginning. We are here to walk you through the process of converting your Procreate artwork into retail-ready art prints.
Before you start working on a new design or illustration, it is best to confirm the canvas size is very large (more extensive than your desired print size), and the resolution should be set to at least 300 dpi.
Tip: For instance, if you plan to sell 16×20, 11×14, 8×10, and 5×7 prints at your next convention, it makes sense to work with a 16-inch x 20-inch canvas at 300dpi. This translates to 4800 x 6000 pixels. You maintain quality downsizing but lose quality upsizing.
To export high-resolution images from Procreate, you must remember a few essential steps. Preparation is vital to producing sharp, retail-quality prints for customers. Let’s get started to learn how to create print-quality images from Procreate.
How to Set Your Procreate Canvas to the Correct Size and DPI
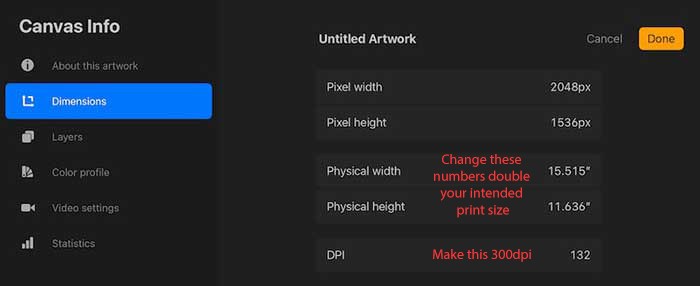
Many image resolution issues are due to small canvas sizes and low DPI. You will want to make sure you begin drawing with an extended canvas and change the default 132dpi to 300dpi. The resolution or dpi (dots-per-inch) is critical to producing high-quality prints. When you create a new Procreate canvas, you may be tempted to choose the “Screen Size” option and call it a day. That setting should only be utilized for basic sketching.
Again, we recommend starting with a 16″ x 20″ canvas if you intend to sell 8″ x 10″ prints. Yes, you could start with an 8×10 canvas instead; however, if you ever plan to print 11×14 prints down the road, your upsized images will not print nearly as well. We feel this strategy offers the best long-term usage of the artwork’s print life. Scaling upwards too much can result in blurry or pixelated final products.
Tip: We recommend artists to make the short side of any new canvas 24 inches at 300dpi. The height or length of your artwork will help us determine what dimensions your smaller prints should be. For instance, a 24×36 image will scale down to 11×17. A 24×30 digital file will scale down to 11×14 better.
While picking a good canvas size is an issue, DPI is often a bigger problem. Procreate already starts you off with a low 132dpi, which is suitable for sharing digitally, but terrible for printing. Even if you switch to 300dpi later using Photoshop, the damage is already done since the art was initially created in 132dpi. Always set preset your canvas to 300dpi before drawing begins.
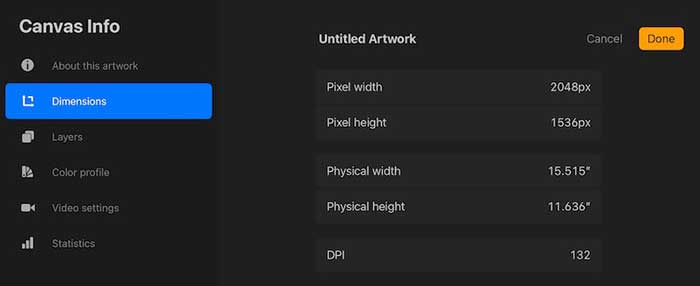
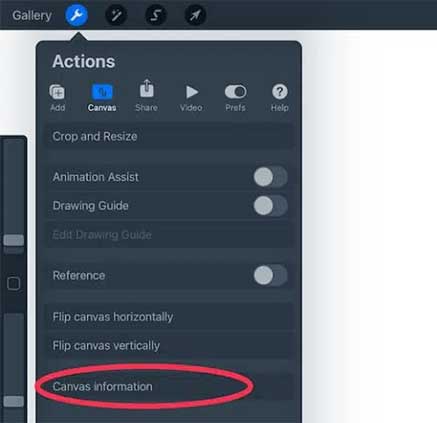
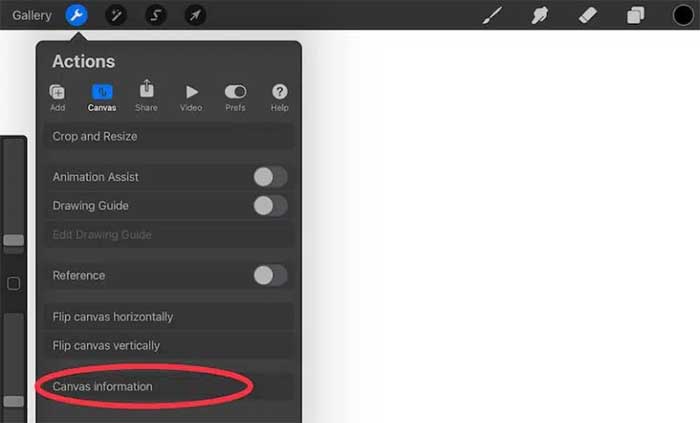
To check the size and DPI of your new canvas, click on the wrench icon to open the “Actions” tab and then click on the “Canvas” button. At the bottom, click on the “Canvas Information” button. This opens a screen with far more information than you’ll ever need to know about your canvas. Click on the “Dimensions” tab to review information about your canvas size and DPI.
A Note About Color
We strongly recommend working in CMYK color mode. You can work in RGB mode (intended for screens and monitors), but most commercial printers will convert prints under 13×19 to CMYK color mode aside from giclee printing specialists. Working in CMYK color mode will help ensure the colors you see are a closer match to your prints. The drawback is some bright colors are not attainable since the RGB spectrum hosts far more colors.
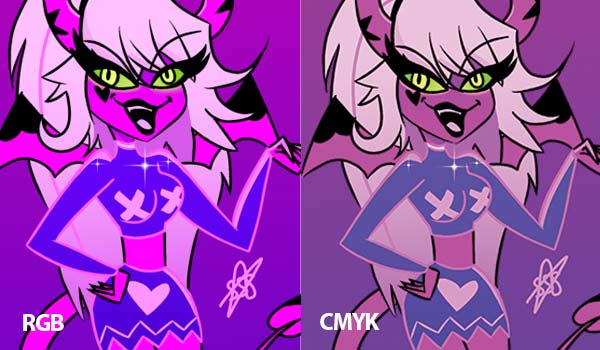
What is the difference? RGB is the color mode that combines Red, Green and Blue light to create the colors you see on screen. It’s the default for Procreate and is great for sharing artwork online. Have you ever noticed that when you print something, it doesn’t look as bright as it does on a well-lit screen? Part of that is because of the absence of light shining from behind the image, but also because printers print in a different color mode: CMYK. This acronym stands for cyan, magenta, yellow, key (black) and corresponds to the ink cartridges inside the printer.
One More Pro Tip
There is one more way to preserve your image quality in Procreate. Export your images as PNG files instead of JPG. PNG files use lossless compression and hold more data than a JPG, making them an excellent choice for full-color digital art and photographs. PNG files can also preserve transparent backgrounds, which can help export art for merchandise.
Conclusion
We hope this article helps you understand how to properly set up your Procreate art into high-quality digital files. For further questions, please feel free to reach out to us!