Categories
Printing, entrepreneurship, and art blog
We see thousands of art files each week at Printkeg. It is quite surprising to see the large percentage of artwork that does not include bleed area. We struggle with designers and non-designers, and due to the workload, we are beginning to charge a small fee to accommodate all of the requests.
What is bleed area?
Bleed is a printing term used to describe a document that has images or elements that touch the edge of the page, extending beyond the trim edge and leaving no white margin. When a document has bleed, it must be printed on a larger sheet of paper and then trimmed down.
What is the problem?
If you do not address bleed area, there is a risk that essential text and images will be cut from the final product, or uneven white lines could appear on the edges.
How do you add bleed area to completed art file?
Since we receive a high number of flattened art files without bleed, there are some quick tactics in Photoshop we implement to adjust.
————————
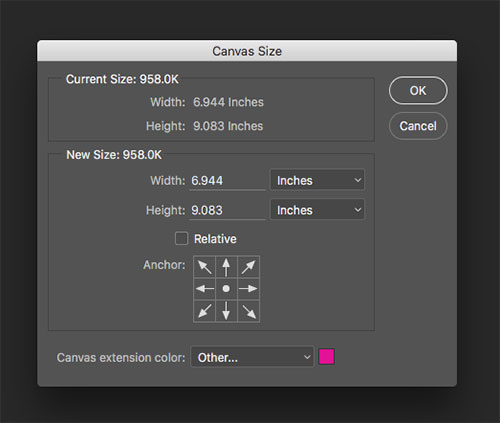
Resizing your image is the first and most common way to add bleed area to artwork. With this method, we would resize an 11×17 poster file to 11.25 x 17.25. Some commercial printers may only require your file to be 11.125 x 17.125. (Image –> Image Size).
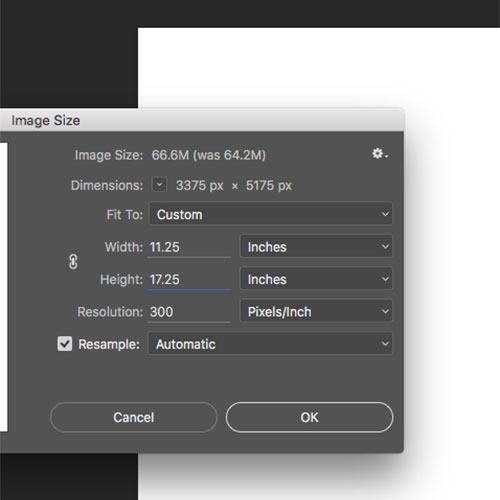
If your poster is 11×17, and the artwork uses a solid color for the background, you can make the art 11.25 x 17.25 with the Canvas Tool. Be sure to use the color picker to select your background color. (Image –> Canvas Size)
In some cases, if you use tactic #1, a valuable area of text might get cut off since it is too close to the edges. Tactic #2 may not work since the background is not a solid color.
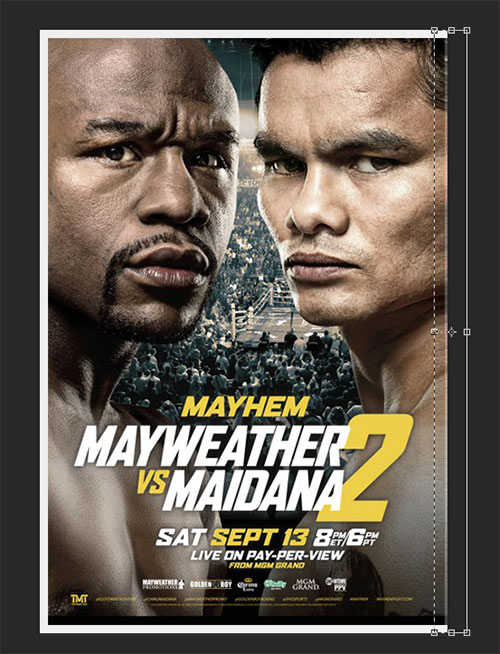
If you are stuck in either scenario, you can increase the canvas area then use the transform tool. Highlight the edges of the graphic then pull that area to cover the new canvas area. The more area you can grab with the tool, the less noticeable the stretching. (After selecting an area, click Edit –> Transform or Command T)
It may look a tad weird, but once trimming occurs it is barely (if at all) noticeable.
Some art we see has a variety of the main areas right next to the edge. Solely extending the canvas area may still not provide enough bleed area. This problem requires you to make the art a tad smaller (10.75×16.75 for an 11×17 file) then using tactic #2 (transform tool) or #3 (extend canvas area).
If your artwork is not yet flattened, you should move items about .25″ away from the edges.
If you cannot wrap your head around the bleed area or do not want any elements clipped, just add a border. For an 11×17 poster print, your centered image should be 10.5 x 16.5.
————————
Conclusion
In the above examples, we focus on 11×17 posters, but the strategies can be implemented with any size including 4×6, 8.5×11, 8×10, and more.
Thankfully, we have created many recorded actions in Photoshop to quickly resolve the daily bleed issues we see the most often. The only time we charge customers (a $9 Just Make My Graphic Work Fee) is if the art requires further manual work from a designer. Learning these easy tactics for addressing bleed will help you no matter what commercial print company you choose.
In our support area, we provide some videos showing some of the above tactics.